DESIGNING YOUR OUTDOOR SHOWER
We see many different creations, some are amazing and some could have so easily been improved with just a little planning and communication. Every client is different and every plumber tackles the project differently, sometimes it is just down to the components that plumbers can source. Plumbing work is normally hidden behind a wall but with an outdoor shower we are celebrating the exposed pipe work, so the fittings and fixtures need to be right as does the workmanship.
I have had several customers come to me after their shower has been installed and complain about the silver screw heads against the copper brackets, or the ugly chrome shower head from Bunning's that the plumber supplied. Somethings are easily fixed and others just aren’t worth the cost and the client is forever looking at that one annoying thing that could have been easily avoided if only they had known in the beginning. So, read on and hopefully you’re are at the beginning.
Hot Tips.
- Obtain a photo of a similar shower you are trying to create and show this to your supplier & plumber.
- I would recommend the client / homeowner buy their own components, but always confirm fixtures and fittings with your plumber before purchasing.
- Be sure to install quality fixtures and fittings that are suitable for outdoor use. Most interior products are plated and will break down outdoors. Best outdoor finishes are, solid brass or copper (not plated) or stainless steel.
- A curved breech is stylish with a hint of a bygone era and creates a streamline flow for the hot and cold mix. A lot of plumbers will make their own breech with press fittings, which is a more modern angular look. Similarly with the shower arm, a pipe with two 90 degree bends is a much cleaner look, and I think more timeless. Personal choice of course
- We recommend using ¾” pipe, purely for aesthetic reasons it looks more substantial and balances out better with the larger shower heads (ie bigger than 100mm). Larger shower heads (200mm plus) are designed to face the ground, not to be installed on a gimble or ball socket.
- Taps – stock standard garden taps are ok, but if your budget permits check out our tap handles and spindles. They will take your shower to the next level of style and function. These quality Australian made spindles and handles are a nicer operation to the standard garden tap.
- Drainage – Don’t forget about drainage, you don’t want the excess water flowing directly under your house creating a dampness issues. We always recommend using a licenced plumber to connect the inlet and outlet in line with Australian standards.
- Consider a handheld or foot / hose tap . Hand showers can be great for pets also.
- Budget – I know budget can restrict a lot of aspirations, but it is important to install products that will stand up to the elements and it is all the more satisfying if they look good as well. You want the shower to blend into your environment and compliment your style.
- Most importantly, if you don't want the stress of hoping all your components blend and the plumber doesn't adds his own interpretation - buy a complete set. You will out lay more $$$$ in the beginning but this may save you in the long run. Happy outdoor showering !!!!

Copper Shower
COMPONENTS

Brass hand held
Add a hand held hose to your outdoor shower, great for pets.
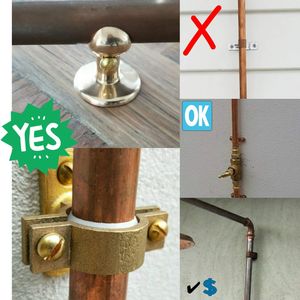
Wall fixings
Fixings make a big difference to the overall look of an outdoor shower. These are probably the hardest things for plumbers to source after the shower head.
Top left- copper pillar clip. Top right -common pipe clip, easily sourced not so pretty. Middle right - copper saddles, pipe sits flush to wall, at least they are the right colour. Bottom right - plastic copper coloured clip- cost effective. Bottom left - solid brass wall clips with matching screws.
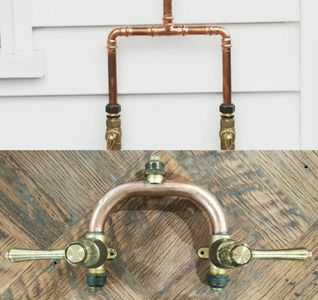
The Breech sets the style
Top breech is made on site by a plumber from press fittings, setting a more contemporary look. Bottom image with a curve is a more traditional style.